I love food. I love experimenting with different tastes, recipes and spices. One of the first blogs I ever followed regularly was not a knitting blog, but a food blog, La Tartine Gourmande. So there's always something simmering in my kitchen. As in many homes it's the centre around which life unfolds.
Since we moved into out new house 4 months ago, I have been busy thinking of decorating (see my Pinterest board) and making our house into a home. I like to be surrounded by things that have a meaning, items I've picked up during my vacations, a memento from my childhood, family photos. And lately also hand-made items, a felted bowl, a knitted pillow-cover and now.....an apron. I know you may think...really? An apron? Why should I be impressed by an apron? But you do not understand, for someone that had to film the sewing instructions she got, this is a big deal!
I am proud to present my second sewing project!
As always, my go-to blog for ideas is The Purl Bee. The Tutorials are the best. I am starting to get the hand of this, though I have to admit that the stripes on the fabric were a life-saver!
I also followed the suggestions of some of my blog followers and purchased the Lotta Jansdotter "Simple Sewing" book and I cannot wait to tackle some of those projects!
How about you? Any great food blogs you care to recommend??
"Simplicity is the ultimate sophistication."- Leonardo da Vinci
8.27.2012
8.12.2012
Levenwick- the mystery of the invisible purl increase
One of my favorite knits so far has been the Levenwick cardigan by Gudrun Johnston . I have worn it countless times, and it is my most admired knit, both in person and on Ravelry. I was asked by a friend of mine to make another one, and I happily obliged. And what better time then now, when there are still 2 months left before the deadline for the Luvinthemommyhood Summer Sweater KAL runs out.
I thought it would be a quick project, since I have already knit it once. I was making quick progress on the cardigan until I got to the yoke, which for increases uses the "invisible purl increase". I remember stumbling across this part the first time around as well, so I hopefully turned to my notes. Alas, I did not make any on this particular subject. So I turned to Google, which surprisingly, failed me, as it had the first time around. I had no choice but ti figure it out on my own....again.
The pattern notes give the following instructions:
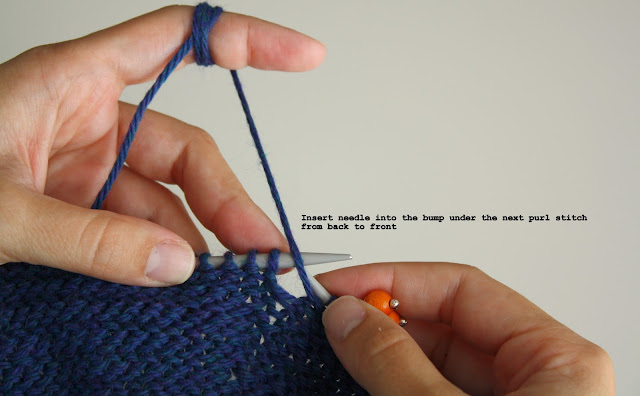
"Insert the right hand needle from the top down into the purl stitch that sits below the next stitch on the left needle. Purl this stitch and then purl the next stitch on the needle."
A decent explanation, but I am that kind of girl that needs pictures. So here's my first ever tutorial on the "invisible purl increase".
Now, I have no way of verifying that this is indeed the correct way of doing it, all I can say that this is how I have knit it. If I am incorrect, please let me know!
And at this point a "thank you" to my husband who took these photos despite some serious hay-fever this morning!
8.05.2012
Spring Garden Tee & why you should always do the measuring yourself!
I've finally finished the "Spring Garden Tee", that was meant to be a birthday gift for my niece. Once the ends were woven in, and it was blocked, I was really excited to see it on my niece. I went over, armed with my camera, ready to take some gorgeous FO shots.
Perhaps I should have known. There had been signs. All I had to do is hold it up to my son for comparison. Or think back on previous conversations with my sister. Because it turns out the tee....is more of a tunic. Apparently that's fine, it only means she'll be able to wear it longer.
I guess.
It does look really cute on her, no?
Subscribe to:
Comments (Atom)


